

FULL COURSE FROM START TO FINISH
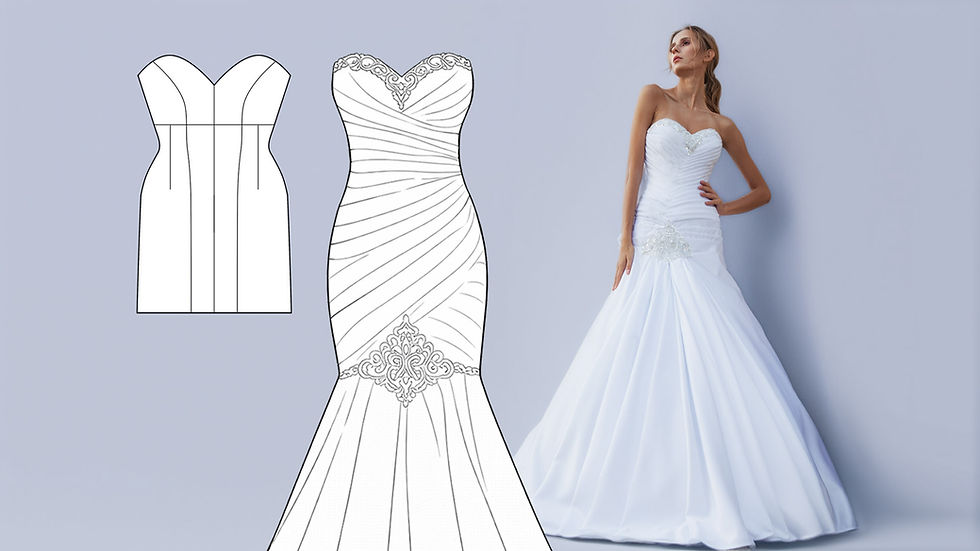
Draped Wedding Dress on a Soft Base
Couture Draping + Custom Pattern Alteration + Handmade Finishing (with a NEW pattern included)
If you’ve ever saved a photo of a bridal dress and thought, “How on earth is that drapery made… and how is it fixed so it actually stays perfect?” — this course is your answer.
In Soft Wedding Dress With Drapery, you’ll learn how to create a true couture bridal gown built on a soft base, then transformed with complex braided drapery, hip draping, and dramatic folds on the skirt and train — all constructed the way it’s done in haute couture ateliers: on a dress form, with minimal machine sewing and a lot of precise handwork.
This is not “glue-and-press” wedding dressmaking.
No fusible net, no shortcuts, no guesswork — just real technique, clean structure, and professional control.
COURSE CURRICULUM
The Dress
Foreword
Tutorial 1. Preliminary pattern alteration
Tutorial 2. Mock-up of altered pattern
Tutorial 3. Pattern finalization for cutting
Tutorial 4. Cup cutting from your handmade material
Tutorial 5. Lining cutting
Tutorial 6. Stitching the cups, tunnels for boning
Tutorial 7. Preparation of the lining pieces
Tutorial 8. Steaming of cups and lining
Tutorial 9. Joining the cup with the lining
Tutorial 10. Strengthening with a waist stay
Tutorial 11. Attaching bones to the lacing area
Tutorial 12. The bone tunnels marking and sewing on
Tutorial 13. Bone insertion
Tutorial 14. Cord for air loops
Tutorial 15. Making the lacing on air loops
Tutorial 16. Final operations with the lining
Tutorial 17. Cutting, sewing and steaming of the dress face
Tutorial 18. Joining the lining and the face on the back
Tutorial 19. Joining the lining with the face on the cups
Tutorial 20. Dress steaming before draping
Tutorial 21. Making the embroidery pattern for the neckline
Tutorial 22. Drapery on the upper left cup
Tutorial 23. Draping on the upper right cup
Tutorial 24. Draping the left side of the dress
Tutorial 25. Draping the right side of the dress
Tutorial 26. Braid drapery in the center of the dress
Tutorial 27. Fabric consumption for the drapery
Tutorial 28. Hand stitches to secure the drapery
Tutorial 29. Securing folds on the cup
Tutorial 30. Securing folds on the dress
Tutorial 31. Preparation to the drapery sewing along the edges
Tutorial 32. Sewing the drapery
The Skirt
Tutorial 33. Calculation of petticoat gores and lining gores
Tutorial 34. Calculation of ruffles and tunnels for petticoat hoops
Tutorial 35. Gore cutting for lining and petticoat
Tutorial 36. Sewing the lining and petticoat. Attaching the hoop tunnels
Tutorial 37. Ruffles for the petticoat
Tutorial 38. Sewing the petticoat and its lining to the dress
Tutorial 39. Cutting pattern for the draped skirt
Tutorial 40. Making the skirt drapery
Tutorial 41. Sewing the drapery to the skirt
Tutorial 42. Finishing the bottom of the skirt
Tutorial 43. Securing the vertical fold on the skirt
The Embroidery Decoration
Tutorial 44. Materials and tools for embroidery
Tutorial 45. Fabric framing for embroidery
Tutorial 46. Pattern tracing
Tutorial 47. Threading sequins. Sequin embroidery technique
Tutorial 48. Embroidery of decorative element on the skirt back
Tutorial 49. Continuation of embroidery with pearl beads
Tutorial 50. Embroidery with various accessories, rhinestone application
Tutorial 51. Creation of front decorative element
Tutorial 52. Creation of decorative element for neckline
Tutorial 53. Completion. Sewing the decorative elements on
Software:
The Dress Pattern Calculation
The Skirt Pattern Alteration
Downloads:
Sewing patterns in PDF


What you’ll create
A soft couture wedding dress featuring:
Braided / interlaced drapery created directly from a fabric piece
Hip-area drapery that sculpts without bulk
Complex folds on the skirt front and train
A lace-up back with ribbon loops, with professional drapery fixing so the back edge stays clean (no “ladder” effect)
What you’ll learn in detail
1) Professional workflow: from pattern → mockup → perfect fit
You’ll learn the exact sequence couture dressmakers follow:
Print + assemble the pattern correctly (including understanding seam allowances and where they aren’t included)
Use automatic calculation tables to alter the pattern to your client quickly — but also learn what must be checked and corrected manually for a flawless result
Make a mockup, fit it on a dress form, and finalize the pattern like a true atelier (so the final dress doesn’t fit like “store-bought standard”)
2) Soft cups that look couture (and don’t collapse)
Soft cups are deceptively hard. This course shows:
How to shape and strengthen a soft cup properly
The tiny mistakes that cause bubbling, flattening, or poor support — and how to avoid them
3) Internal couture structure for a smooth, secure fit
A soft dress still needs internal engineering — especially with lacing.
You’ll learn:
How to reinforce the dress so lacing doesn’t stretch or tear the garment
Where and why to use internal support like a waist stay, under-bust strengthening, and bones/tunnels to keep the dress smooth and stable
4) Drapery that’s not just pretty — but professionally fixed
The difference between “Pinterest draping” and couture draping is simple: how it’s secured.
You’ll learn:
Which threads and hand stitches to use for tacking drapery on the bodice, hips, and skirt
How to fix drapery at the lacing edge so folds stay clean and even
What you get
A new, dedicated pattern developed specifically for this draped bridal design
Automatic calculation tables to alter the dress pattern and calculate elements like the petticoat/tulle ruffles (with adjustable fullness based on tulle type)
Step-by-step tutorials for pattern alteration, mockup fitting, internal structure, and couture assembly
A couture mindset upgrade: you’ll learn how to plan complex gowns without wasting expensive fabric (and why small-scale mockups save you from costly mistakes)
Problems this course solves
“I can drape folds… but they don’t stay clean.” → You’ll learn professional tacking and fixing methods.
“My soft bridal bodice wrinkles when laced.” → You’ll build the internal support system that prevents distortion.
“I don’t trust my fit on complex dresses.” → You’ll use the couture process: alter → mockup → analyze → finalize.
“I want couture results without glue or shortcuts.” → This course is built around true atelier technique.
The outcome
By the end, you’ll be able to confidently:
Create a soft couture bridal base with clean structure and stable fit
Build and secure complex drapery on bodice, hips, skirt, and train
Work with a professional workflow that lets you repeat the technique for new designs and clients
Produce a gown that looks (and feels) haute couture — inside and out
Who this course is for
Perfect for:
Dressmakers who want to sew bridal gowns with couture draping
Designers who want professional structure under a soft, romantic look
Anyone who wants to move beyond “pretty” and into true atelier-level technique
Not ideal if:
You want a quick, beginner “weekend dress.” This is couture work — detailed, technical, and worth it.


Trusted by thousands of dressmakers worldwide since 2010
Whether it's a first stitch or the last rhinestone on your gown, Dressmaking Academy is here to support you on every step of your creative journey.

Marina Kushnir
★★★★★
I made a perfect wedding dress for my daughter—and it was my very first time making a dress!

Kriti Singhal
★★★★★
I proudly launched my own brand and marked a moment I’ll never forget—my very first fashion show on the ramp

Joslyn Mcdonald
★★★★★
It's a game-changer! I've sharpened my skills, and took my business to the next level.

Tugba Citak
★★★★★
I made my own custom amazing wedding dress! The lessons were very easy to follow as everything is explained step by step.
GET THIS COURSE.
START LEARNING TODAY.
Price with VIP pass
$199
$0.00 USD
Enjoy this course and all 60+ premium courses, sewing patterns, tools, community access, and personal support unlimitedly.

Any further questions?
Contact admissions at info@dressmaking.academy.